Help! I broke my board. Now what?#

Ok, so you managed to create, upload a bad Gateware build and now BeagleV-Fire won’t boot anymore.
Is it dead? Do you throw it out or RMA the thing?

Never fear, help is here, but first things first: The Big Picture!

The Big Picture#

Just like you got taught in First Aid training, the steps are:

  • Stop the Accident.

  • Get the Big Picture.

So we turn off the power and try to get the Big Picture.

Like so many of it’s cousins, BeagleV-Fire also comes with a debug serial port,
and we need to connect to it for a level 1 triage:

If you already have, you’re all set and can proceed to the next section.
Otherwise, please take a look at how to set it up and then come back here.

Right, you’re back. Lets get your favorite Serial Terminal program fired up and set the BAUDRATE to 115200.

From here on out, we’re going to assume that your serial is working.

Tip

If in doubt, short RX and TX on the probe side and type something in the Terminal.

Level 1: Triage#

Ok, now that we’re no longer driving blind, lets turn the power back on and take a first quick look at the situation.

One of two things will happen on the Terminal at this point:

  • Absolutely nothing.

  • The hart-software-services, HSS for short, will greet you.

It’s dead, Jim!#

Ouch! That was the worst possible outcome. You’ve broken the processors ability to start properly.
Did you mess with the MSS configuration?

In this case, you’re going to need a FlashPro 5 from Microchip for JTAG access.
This procedure is outside the scope of this document,
but luckily Microchip has good documentation on how to recover a stalled PolarFire SoC.

HSS started, phew!#

Alright, it’s not completely dead, so we continue down the path.

Next junction:

  • It does not find and execute u-boot.

  • It does!

In any case, onward to level 2…

Level 2: U-Boot#

U-Boot was not found by HSS#

Ok, uncommon problem when flashing Gateware, but nevertheless, lets address the problem:
Your eMMC image got damaged, so you’ll have to reprogram it.

Once that’s taken care of, we can continue to the next step.

U-Boot found and loaded#

So far, so good. U-Boot got loaded.

Next junction:

  • It is unable to locate a Linux kernel.

  • It boots into Linux.

No Linux kernel#

Remedy same as before; the eMMC image is damaged, so you’ll have to reprogram it.

Note

As reprogramming the eMMC fixes both U-Boot and Linux kernel at the same time,
it is very unlikely that you’ll hit this problem twice.

Linux boots, but Oops’s before reaching Userland#

This is the most common scenario, so lets examine how to deal with that:

Press the Reset button and then let BeagleV-Fire restart,
but interrupt U-Boot by pressing <ESC> to break into the command prompt.

Tip

If by some hand of Evil, U-Boot does not react to you pressing <ESC>, it might be because HSS is still hugging the serial port.

Try restarting the process by pressing the Reset button, but this time you interrupt on the HSS step by hitting <Enter>.
(yes, the magic incantation is different).

Once on the HSS command prompt, give the command boot to proceed and return here.

Level 3: Linux boot#

Now, what U-Boot normally does behind the scenes is to run the following:
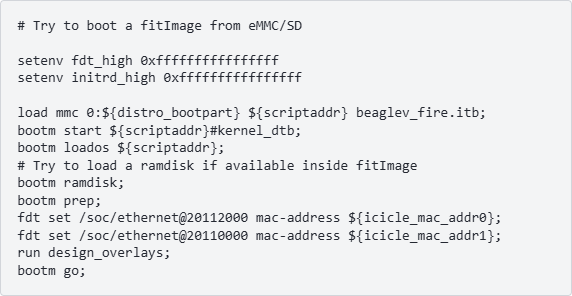
../../../../../_images/gateware-help-i-broke-instructions.png
Since most of the time the kernel will be Oopsing on some device or memory you’re trying to bring
to the attention of the kernel, the way to push through to Userland is to make the kernel
forget about your device completely.
As this knowledge is stored in the device-tree, what we want is to run the above, except for the run design_overlays bit.

Unfortunately, since the command buffer of U-Boot isn’t overwhelmingly big,
we have to break up the commands into bite-size chunks, so that’s what we’ll do:

Copy each of the following lines, one by one, using the nifty Copy button and paste it into your Terminal.
(Reveal the button by hovering your Mouse over the line)
setenv fdt_high 0xffffffffffffffff
setenv initrd_high 0xffffffffffffffff
load mmc 0:2 ${scriptaddr} beaglev_fire.itb;
bootm start ${scriptaddr}#kernel_dtb;
bootm loados ${scriptaddr};
bootm ramdisk;
bootm prep;
fdt set /soc/ethernet@20112000 mac-address ${icicle_mac_addr0};
fdt set /soc/ethernet@20110000 mac-address ${icicle_mac_addr1};

Note

We’ll be skipping the offending overlays; this is very much on purpose.
Finally, this next bit should get us to Userland and we’re free to upload a hopefully fixed Gateware build:
bootm go;

Tip

If you’re thinking, “hang on” here, you’d be right: You can do all kinds of other
nifty things with that fdt command before you tell the kernel to rip.

The Sky’s the limit; just be careful of that Sun burning those wings of yours…