Microchip 2025.1 FPGA Tools Installation Guide#
Instructions for installing the Microchip FPGA tools on a Ubuntu 20.04 or 22.04 desktop.
Important
We will be providing instances of Libero that you can run from git.beagleboard.org’s gitlab-runners such that you do not need to install the tools on your local machine.
Install Libero SoC#
Download the Microchip.zip folder into your /home/$USER/ directory:
Unzip the downloaded file:
unzip Microchip.zip
Download the Libero SoC installer from Microchip’s fpga and soc design tools section.
unzip libero_soc_2025.1_online_lin.zip
sudo ./Libero_SoC_2025.1_online_lin.sh
Important
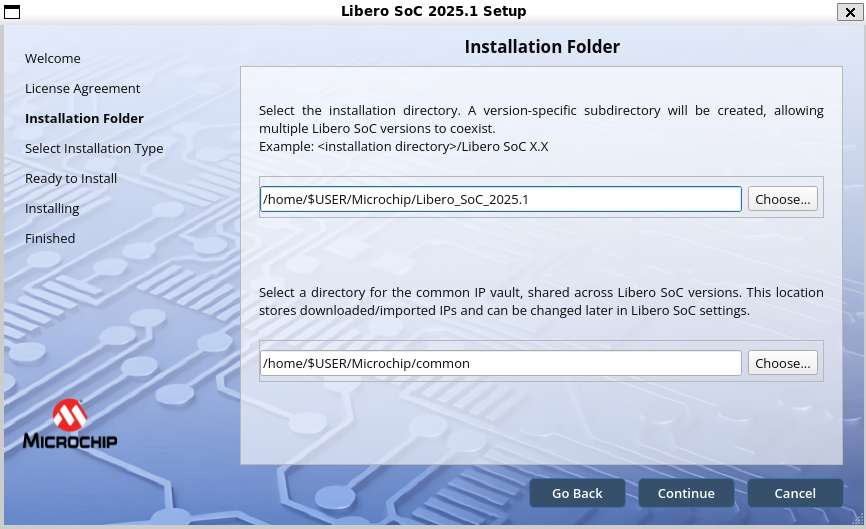
Install into: ~/Microchip/Libero_SoC_2025.1
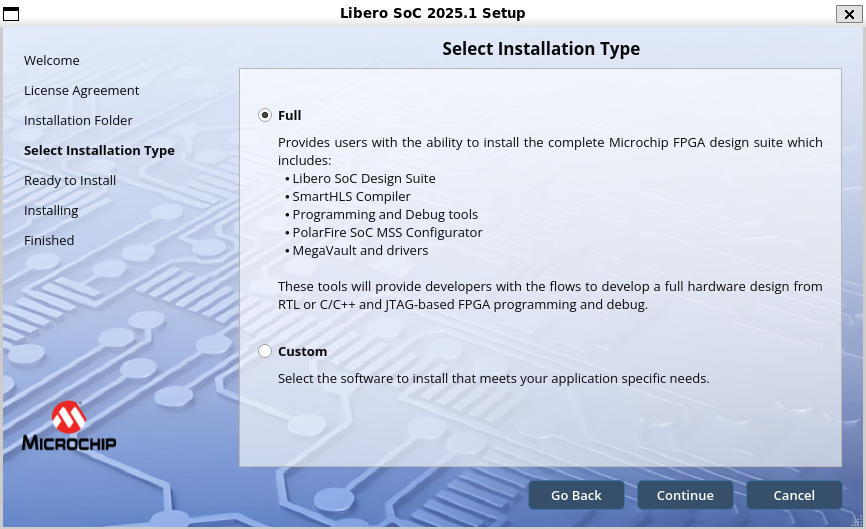
The following images show the options to select during the installation process:
Important
Select the Full installation option.
Run the post installation script which will install missing packages:
sudo /home/$USER/Microchip/Libero_SoC_2025.1/req_to_install.sh
Install SoftConsole 2022.2#
Download the installer from the Microchip website.
sudo chmod +x Microchip-SoftConsole-v2022.2-RISC-V-747-linux-x64-installer.run
./Microchip-SoftConsole-v2022.2-RISC-V-747-linux-x64-installer.run
Accept the license, Click Forward, Finish.
Follow the post-installation steps or more conveniently, install the required packages using the streamlined script in /home/$USER/Microchip/Package-Install
chmod +x install-required-packages.sh
sudo ./install-required-packages.sh
Run the following commands to copy the rules file, enabling non-root user to access FlashPro:
cd /home/$USER/Microchip/SoftConsole-v2022.2-RISC-V-747/openocd/share/openocd/contrib
sudo cp 60-openocd.rules /etc/udev/rules.d
sudo udevadm trigger
Request a Libero Silver license#
Choose “Libero Silver 1Yr Floating License for Windows/Linux Server” from the list.
Enter your MAC address and click register.
Note
A MAC address looks something like 12:34:56::78:ab:cd when you use the “ip address” command to find out its value on your Linux machine. However, you need to enter it as 123456abcd in this dialog box.
You will get an email with a License.dat file. Copy it into the ~/Microchip/license directory. Then run the provided license file setup script in the same directory:
chmod +x setup-license-file-2025-1.sh
./setup-license-file.sh
Setup tools script#
Add this to your ~/.bashrc file.
First, type:
nano ~/.bashrc
Then, copy the following lines to the end of the file:
if [ -f "/home/$USER/Microchip/FPGA-Tools-Setup/setup-microchip-2025-1-tools.sh" ]; then
 . "/home/$USER/Microchip/FPGA-Tools-Setup/setup-microchip-2025-1-tools.sh"
fi
To deal with a ca-certificates issue, it is recommended to run the following commands:
sudo mkdir -p /etc/pki/tls/certs/
sudo ln -s /etc/ssl/certs/ca-certificates.crt /etc/pki/tls/certs/ca-bundle.crt
Your directory structure should appear like so:
Microchip/
├── common/
├── FPGA-Tools-Setup/
│   └── setup-microchip-2025-1-tools.sh
├── Libero_SoC_2025.1/
│   ├── Libero_SoC/
│   ├── LicenseDaemons/
│   ├── MegaVault/
│   ├── req_to_install.sh
│   └── SmartHLS/
├── license/
│   ├── License.dat
│   ├── license.log
│   └── setup-license-file-2025-1.sh
├── Package-Install/
│   └── install-required-packages.sh
└── SoftConsole-v2022.2-RISC-V-747/
You can now run the Beaglev-fire gateware scripts Beaglev-fire gateware scripts.
and create your own custom design.
License Issues running the gateware script#
If you encounter a license checkout error such as:
License Checkout Error: Cannot locate license file. Use LM_LICENSE_FILE to specify a different license file.Finished
Try running the following command to view the processes using the 1702 port:
lsof -i :1702
You should see output similar to:
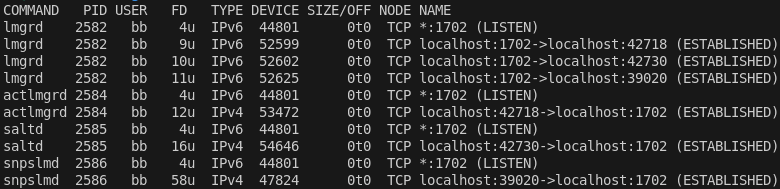
Kill the lmgrd process using the port, in this example, the process ID is 2582:
sudo kill -9 2582
Now open a new terminal and rerun the gateware script. The issues should be resolved.
